
Today’s blogpost is contributed by one of our users: Andrea Mazzini, and originally appeared on his blog. Andrea is cofounder and iOS developer at Fancy Pixel, an Italian company building web and mobile apps for iOS and Android. You can find Andrea on GitHub and Twitter.
It’s been a busy year for iOS developers. We got a slew of new toys to play with: a new version of iOS, new frameworks, a new language, new screen sizes and some new hardware to put on our wrists, just as soon as we thought that watches were anachronistic.
New technology is always exciting, but keeping up to date can be a daunting task when deadlines keep getting closer. Lately I’ve been taking some time off to delve deeper in these new topics and build a simple app out of it (that we are planning to open source). At the time of this writeup the app is still waiting to be reviewed, so we’re going to just focus on something that I learned in the process and that can be useful to a lot of other iOS devs: sharing data between your app and its WatchKit extension, using Realm.
Why Realm
Realm is a great replacement for both SQLite and Core Data, it offers a quick and painless way to persist data in your iOS (and Android) app. The thing that makes it so great is the ease of use, it reduces your boilerplate code to next to nothing (I’m watching you, Core Data), keeping things at a high level of abstraction (I’m watching you SQLite) and… it’s fast. It really is a brilliant piece of software, and I urge you to checkout the official documentation if you’re in need of a persistence framework for your app.
The Sample App
We’re going to learn how to share data between an app and its WatchKit extension, and what better way to use a sample app as reference?. I’m not a fan of TODO app demos, they always feel… unimaginative… but I have to admit that they are the perfect sample for a task like this. So, bear with me, let me introduce to you another TODO sample app: Done!, a simple TODO list where we can add items and mark them as done from our Apple Watch.
Setting up Realm
WatchKit extensions are just another target inside your app, just like Today extensions, so they are packed alongside your app, but they have their own life, and most importantly, their own bundle identifier. This means that data stored within an app is not visible to the extension and vice versa. Apple offers a way to solve the issue through app groups.
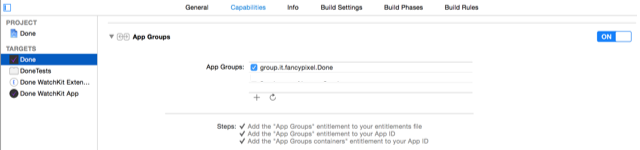
App groups, like bundle identifiers, are defined by a reverse URI and they are prefixed with group.. They let you share data between your apps and are tightly bound to your provisioning profile (luckily Xcode handles their creation in your developer portal with ease).
We can take advantage of that to create our Realm database in a shared space that will be visible (and writeable) by both our app and the app’s WatchKit extension. Let’s start by creating the group in our project’s capabilities section:
Once this is out of the way we can tell Realm to store the database inside the group.
We’ll do so in our AppDelegate’s application(application: didFinishLaunchingWithOptions launchOptions:) function:
let directory: NSURL = NSFileManager.defaultManager().containerURLForSecurityApplicationGroupIdentifier("group.it.fancypixel.Done")!
let realmPath = directory.path!.stringByAppendingPathComponent("db.realm")
RLMRealm.setDefaultRealmPath(realmPath)
That’s it, Realm is ready to go, we just need to define a model to persist. Let’s do it:
// Entry.swift
import Realm

class Entry: RLMObject {
  dynamic var title = ""
  dynamic var completed = false
}
ViewController
The ViewController handling the TODO list will be rather simple, it’ll hold a plain UITableView with a custom header presenting the UITextField for the user’s input, nothing fancy:
// ViewController.swift
import Realm
import UIKit

class ViewController: UIViewController, UITableViewDelegate, UITableViewDataSource, UITextFieldDelegate {

    @IBOutlet var tableView: UITableView!
    var dataSource: RLMResults!

    override func viewDidLoad() {
        super.viewDidLoad()
        reloadEntries()
    }

    func tableView(tableView: UITableView, viewForHeaderInSection section: Int) -> UIView? {
        let container = UIView(frame: CGRectMake(0, 0, self.view.frame.size.width, 60))
        let textField = UITextField(frame: CGRectMake(10, 10, self.view.frame.size.width - 20, 40))
        textField.delegate = self
        textField.textColor = UIColor.whiteColor()
        let placeholer = NSAttributedString(string: "Add an item", attributes: [NSForegroundColorAttributeName: UIColor.lightGrayColor()])
        textField.attributedPlaceholder = placeholer
        container.addSubview(textField)
        return container
    }

    func reloadEntries() {
        dataSource = Entry.allObjects()
        self.tableView.reloadData()
    }

    func textFieldShouldReturn(textField: UITextField) -> Bool {
        textField.resignFirstResponder()

        let realm = RLMRealm.defaultRealm()
        realm.beginWriteTransaction()
        let entry = Entry()
        entry.title = textField.text
        entry.completed = false
        realm.addObject(entry)
        realm.commitWriteTransaction()
        reloadEntries()
        return true
    }

    func tableView(tableView: UITableView, numberOfRowsInSection section: Int) -> Int {
        return Int(dataSource.count)
    }

    func tableView(tableView: UITableView, cellForRowAtIndexPath indexPath: NSIndexPath) -> UITableViewCell {
        var cell = tableView.dequeueReusableCellWithIdentifier("Cell") as UITableViewCell
        let entry = dataSource[UInt(indexPath.row)] as Entry
        cell.textLabel!.text = entry.title
        cell.accessoryType = entry.completed ? .Checkmark : .None
        return cell
    }

    func tableView(tableView: UITableView, didSelectRowAtIndexPath indexPath: NSIndexPath) {
        let entry = dataSource[UInt(indexPath.row)] as Entry
        let realm = RLMRealm.defaultRealm()
        realm.beginWriteTransaction()
        entry.completed = !entry.completed
        realm.commitWriteTransaction()
        reloadEntries()
    }
}
As you can see we are retrieving the table view’s items from Realm with a simple call:
Entry.allObjects()
and storing the changes with a couple of lines:
realm.beginWriteTransaction()
let entry = Entry
entry.title = textField.text
entry.completed = false
realm.addObject(entry)
realm.commitWriteTransaction()
If you worked with Core Data in the past you should have a better understanding of my claim “less boilerplate code”.
WatchKit
Ok, new technology, new framework, so much to learn, right?
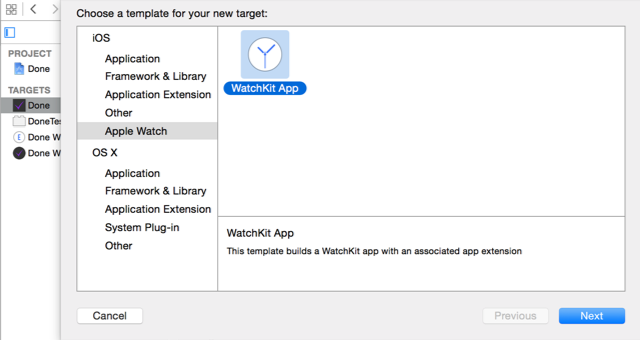
Well, it turns out that Apple did some thinking on this, and for what I witnessed, developing a Watch app is going to feel familiar for a lot of Cocoa and Cocoa Touch developers, albeit with some significant philosophical changes. First things first, let’s create a new target holding the Watch app:
Then, the layout. We won’t be using Autolayout, but something reminiscing a simplified version of Android’s linear and relative layouts (no need to touch beefy XML files though, storyboards are still there for us). The layout for this will be a WKInterfaceTable with a custom TableRowController, holding a WKInterfaceImage and a WKInterfaceLabel:
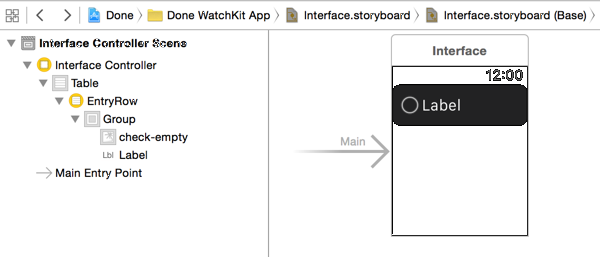
The custom TableRowController is a plain class with a couple of properties, so let’s take a look at this first:
class EntryTableRowController: NSObject {
    @IBOutlet var imageCheck: WKInterfaceImage!
    @IBOutlet var textLabel: WKInterfaceLabel!
}
Pretty straightforward, think of it as the equivalent of a custom UITableViewCell.
Let’s take a look on how to populate the table:
override func awakeWithContext(context: AnyObject?) {
    super.awakeWithContext(context)

    let directory: NSURL = NSFileManager.defaultManager().containerURLForSecurityApplicationGroupIdentifier("group.it.fancypixel.Done")!
    let realmPath = directory.path!.stringByAppendingPathComponent("db.realm")
    RLMRealm.setDefaultRealmPath(realmPath)
    reloadTableData()
}

func reloadTableData() {
    let realm = RLMRealm.defaultRealm()
    let dataSource = Entry.allObjects()

    watchTable.setNumberOfRows(Int(dataSource.count), withRowType: "EntryRow")

    for index in 0..<Int(dataSource.count) {
        let entry = dataSource[UInt(index)] as Entry
        if let row = watchTable.rowControllerAtIndex(index) as? EntryTableRowController {
            row.textLabel.setText(entry.title)
            let imageName = entry.completed ? "check-completed" : "check-empty"
            row.imageCheck.setImageNamed(imageName)
        }
    }
}
That’s a little different from what we’re used in UIKit. No delegate nor dataSource, in WatchKit we explicitly define every row before showing the table.
Also, as you can see in the awakeWithContext function, we are setting up Realm as we did in the main app. As a side note, the pieces of code that are shared between the two targets (in our case, everything concerning the model) should be moved in a custom framework to avoid code duplication. For the purpose of this sample I opted to duplicate the Realm initialization and shared the model between the two targets, but in a more structured app I would definitely take the framework route.
If we build and run we can add an item on the phone, and once we reload the app we’ll see the same item in the watch extension too.
That doesn’t feel very responsive though, right? We’ll fix that in a bit, but first let’s add the ability to mark an item as done from the watch:
override func table(table: WKInterfaceTable, didSelectRowAtIndex rowIndex: Int) {
    let dataSource = Entry.allObjects()
    let entry = dataSource[UInt(rowIndex)] as Entry
    let realm = RLMRealm.defaultRealm()
    realm.beginWriteTransaction()
    entry.completed = !entry.completed
    realm.commitWriteTransaction()
    reloadTableData()
}
That pretty much covers it. Right now it’s even more apparent that even if the two apps are communicating, there’s no real sense of interaction, since we need to reload the app to see the changes.
Syncing data
We need to somehow advertise that our watch app or our main app performed something meaningful. There are official ways to do that, and you can read more about them on this blog post from Natasha The Robot, but in this case I want to show you how a brilliant library called MMWormHole can abstract this task for us.
MMWormHole
MMWormhole creates a bridge between an app and its extensions. The API is clear and concise and it has a delightfully geeky name. It works like a pub/sub system, one end registers its interest for a kind of message (defined by a string identifier), and the other end can broadcast a new event. When the event is raised the subscriber’s handler is fired. Sounds like something we can leverage from our app. Let’s start by registering interest in watch updates on our main app:
self.wormhole.listenForMessageWithIdentifier("watchUpdate", listener: { (_) -> Void in
    self.reloadEntries()
})
and on our watch app we’ll listen for main updates:
self.wormhole.listenForMessageWithIdentifier("mainUpdate", listener: { (_) -> Void in
    self.reloadTableData()
})
And that’s it. When something changes in our model we just need to call these function:
// From the watch
self.wormhole.passMessageObject("update", identifier: "watchUpdate")

// From the main app
self.wormhole.passMessageObject(someObject, identifier: "mainUpdate")
Realm notifications
Update
Once this post was live, Tim Anglade from Realm reached out to me and was kind enough to point out that there’s a built-in notification system in Realm, so MMWormHole in this case isn’t really needed. The API is really easy to use and requires no configuration, here’s how it works:
realmToken = RLMRealm.defaultRealm().addNotificationBlock { note, realm in
    self.reloadEntries()
}
As long as we keep a strong pointer to the token, the system fires the notification block as soon as a write transaction is committed. You can find the updated code in the sample app.
Demo
Here’s the demo app in all of its glory:
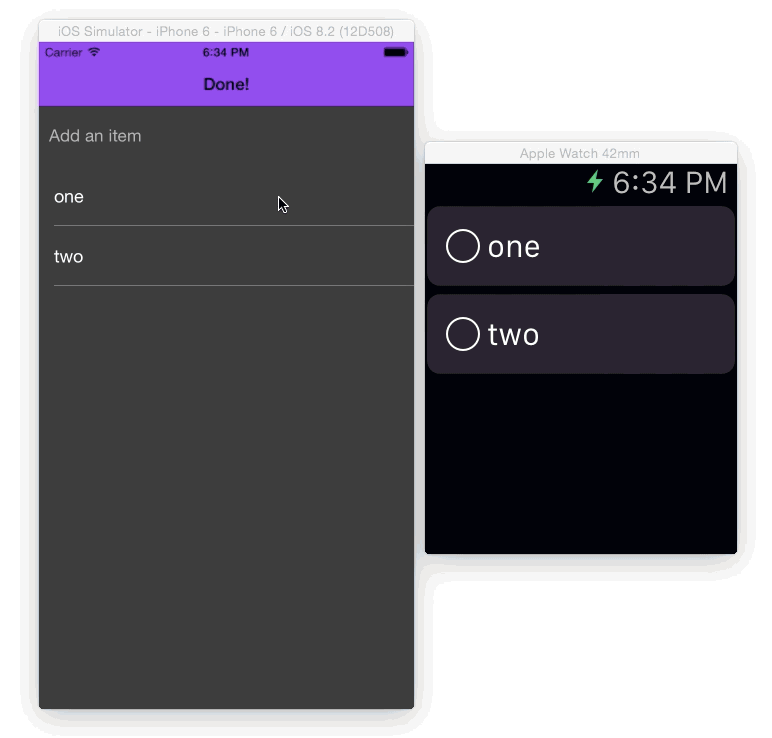
As you can see it’s really easy to bootstrap a simple app for WatchKit, and thanks to a couple of great open source libraries adding persistence and interactivity is a painless effort. A big thank you to both the Realm team and Mutual Mobile for the amazing work on MMWormHole.
You’ll find the source code of the demo app on my GitHub page. Feel free to leave a comment, we’d love to hear your feedback.
Many thanks again to Andrea Mazzini for letting us reproduce this post from his blog. You should check him out on GitHub, or email us if you want to share a tutorial or article about Realm on this blog.
About the content
This content has been published here with the express permission of the author.


