

While building Calligraphy, Chris uncovered some interesting aspects of the LayoutInflater and its unknown side effects. He will cover how the LayoutInflater works, and how Calligraphy hacks the lifecycle to inject into views at inflation time.
Introduction
I’m Chris Jenx, the CTO at OWLR, and we make IP camera software. I’ve been an Android engineer for over six years, and have made multiple apps - some with over a million users.
In winter 2013, I had the idea to inject fonts into TextViews. There wasn’t any way of doing that, and we were stuck using custom views instead.
This was not ideal for the following reasons:
- It’s difficult to extend with AppCompat. You have to start extending all your classes and it’s hard to maintain.
- Custom views are difficult to extend.
- Applying a font or attribute across any
TextViewor custom view is not possible.
As a solution, I made a library called Calligraphy, which provides Layout Inflation Injection.
Using a LayoutInflator
First, this is the correct way to use LayoutInflator.
LayoutInflater inflater = LayoutInflater.from(Context context);
That’s not the only way, but it’s technically the safest way of doing it. Under the hood it actually does this:
(LayoutInflater) context.getSystemService(Context.LAYOUT_INFLATER_SERVICE);
The reason why a person should not use the underlying implementation is because it may change and no longer use the static call.
Only use the instance that’s given to you
Do this:
public View onCreateView(LayoutInflater inflater, ViewGroup container,
      Bundle savedInstanceState) {
    return inflater
        .inflate(fragment_order_list, container, false);
}
Not this:
public View onCreateView(LayoutInflater inflater, ViewGroup container, Bundle savedInstanceState) {
    return getActivity().getLayoutInflater()
        .inflate(fragment_order_list, container, false);
}
In ListViews for example,the LayoutInflator should come from the parent context. The same applies for RecylcerViews or a custom view. The reason for this has to do with Context and how it’s extended.
Take the following for example:
	class MyApplication extends Application {
	   public void onCreate() {
       // Application LayoutInflater
       LayoutInflater.from(MyApplication.this)
	   }
	}

	class MyFirstActivity extends Activity {
		public void onCreate(Bundle savedInstanceState) {
    	// Activity LayoutInflater
    	LayoutInflater.from(MyFirstActivity.this)
		}
	}
In Java, you use this, because Application and Activity are contexts.
Using the Application Class’ context, you get the theme from the application level manifest, and you get the theme from your activity if you use the Activity level context. If you were to use the wrong context, you’d get the incorrect theme when inflating views.
Additional Layout Inflator Methods
Layout Inflator has a layoutResource, attachToRoot and a parent parameter inside this inflate method.
The Parent property is a view group that will be the parent.
If you don’t pass the parent in while inflating a TextView, it will ignore layouts width and heights and any other property which a linear layout needs to correctly size the view inside of it.
	<LinearLayout android:layout_width="match_parent"
              android:layout_height="match_parent"
              android:orientation="vertical">
	<TextView android:layout_width="wrap_content"
            android:layout_height="wrap_content"
            android:weight="1"/>
	</LinearLayout>
	inflater.inflate(layoutRes, parent, false);
	// Does this:
	viewGroup = createView(activity.context, ...); // FrameLayout
	view = createView(viewGroup.context, ...) // TextView
	// Attrs only available at inflation time!
	params = viewGroup.generateLayoutParams(viewAttrs);
	// Can now tell parent how to be laid out.
	view.setLayoutParams(params);
Converting what an inflation method does into code is somewhat similar to this. It inflates this view, asks the view group to generate the layout parameters with these view parameters, passes it to its parent, and then sets the layout parameters onto the TextView.
How LayoutInflater Works
When you create a layout XML, it goes through AAPT, which is one of the Android processing steps when it builds an APK, turning the layout XML into an optimized version of an XML.
You won’t be able to extract a layout inflater from the APK at runtime and parse it yourself as it won’t work. When you start to inflate, it actually looks up an already optimized and created XML pull parser.
When you call inflate on a view, it looks up a Pull Parser from the pre-compiled resources and runs through an Inflate Method inside the Layout Inflater.
A constructor is called when creating a view, and checks for children before inflating. It recurses back up the tree, calls on finished inflator, returns your view, and attaches to the parent if one is present.
Here is a code example:
	<FrameLayout>
		<TextView />
		<ImageView />
	</FrameLayout>
	//1. Inflates root view
	root = new FrameLayout(...);
	//2. look for children
	view = new TextView(...);
	//3. has children?
	view.onFinishedInflate();
	//4. next tag
	view = new ImageView(...);
	//5. has children?
	view.onFinishedInflate();
	//6. next tag? end? step out of recursion.
	root.onFinishedInflate();
	// next tag? end? return
	return root;
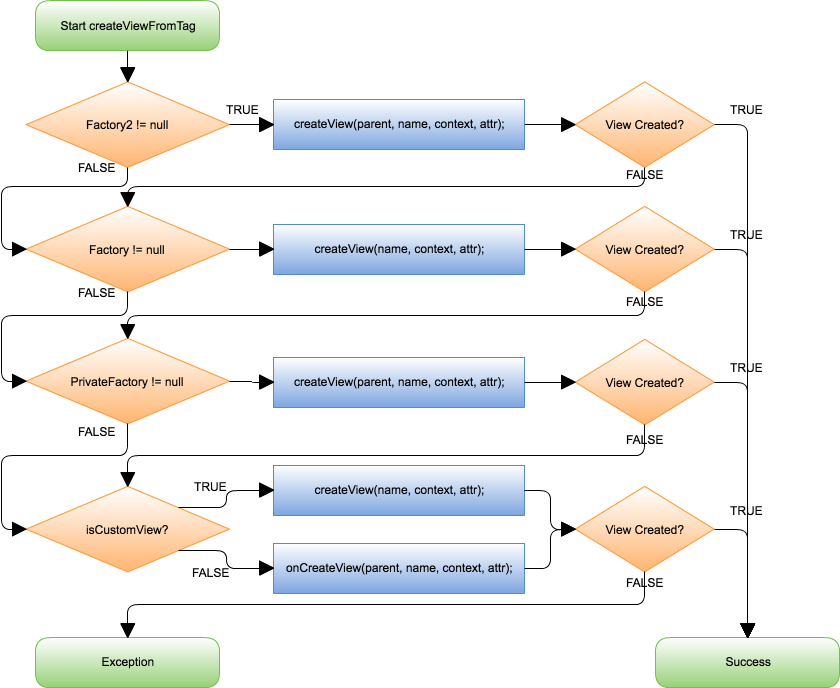
When you create a view, this chain happens from the XML.
It starts with factory two - if the factory class exists, it tries to create it along with the view. If it doesn’t, it goes to the next factory, then goes to the private factory if that is not successful. If your view isn’t been inflated from XML, it throws an exception.
Factories
I define a factory as a hook into the Layout Inflater that intercepts the tag names from layout files.
	// MyActivity.java:
	public void onCreate(Bundle savedInstanceState) {
		LayoutInflater inflater = LayoutInflater.from(this);
		inflater.setFactory2(new LayoutInflater.Factory2() {
     		@Override
      		public View onCreateView(View parent, String name,
            		Context context, AttributeSet attrs) {
        		if("FrameLayout".equals(name))
          			return new FrameLayout(context);
        		return null;
      		}
      		@Override public View onCreateView(String name, Context context,
            AttributeSet attrs) {
        		if("FrameLayout".equals(name))
          			return new FrameLayout(context);
        		return null;
      		}
    	});
	}
I get the LayoutInflater from its context, and it sets the Factory Two method. The reason why there are two factories is because they added it in API 11 this new method. The only difference is that it added parents.
A Factory One is this:
// MyActivity.java:

public void onCreate(Bundle savedInstanceState) {
		LayoutInflater inflater = LayoutInflater.from(this);
		inflater.setFactory(new LayoutInflater.Factory() {
    		@Override public View onCreateView(String name, Context context,
          			AttributeSet attrs) {
      			if("FrameLayout".equals(name)) return new FrameLayout(context);
      			return null;
    		}
		});
}
AppCompat
AppCompat does something similiar to the above. The following is a simplified version of what AppCompat does:
	public final View createView(View parent, final String name,
        	@NonNull Context context, @NonNull AttributeSet attrs) {
		View view = null;
		switch (name) {
     		case "TextView":
         		view = new AppCompatTextView(context, attrs);
         		break;
     		case "ImageView":
         		view = new AppCompatImageView(context, attrs);
         		break;
     		//... All AppCompatViews
		}
		return view;
	}
If you look at the original commit, it checks if it’s trying to create a TextView and returns the AppCompat TextView. This provides things like tinting, and all the other attributes.
Building Calligraphy
The goals of Calligraphy were simple. I want to enable font injection everywhere, and I want to expose onCreate Views so I get the View that I’ve created, and the Attributes that created that view.
The initial concepts of Calligraphy enables the injecting of fonts everywhere, and it enables styles everywhere.
ViewPump
Calligraphy is where ViewPump was born. We added a few things to Calligraphy. Namely, we turned inflation into an interceptor based mechanism.
ViewPump was the brain child of James Barr. He took core parts of Calligraphy and turned it into this new library.
There is a new organization called InflationX ViewPump and InflationX Calligraphy.
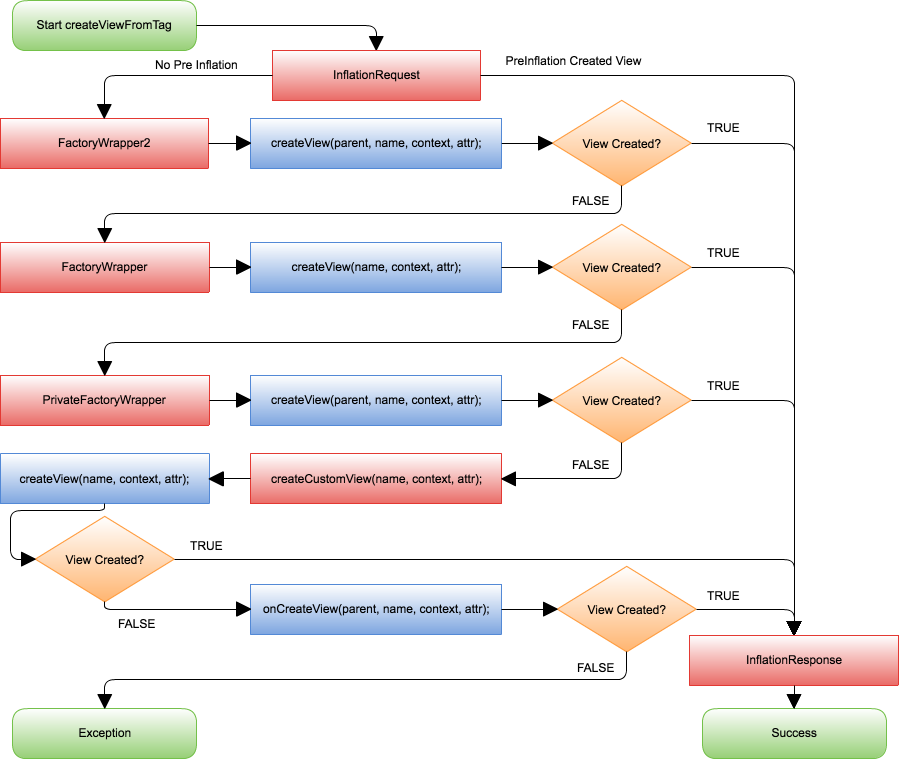
We have Interceptors where we get a chain result, which works a bit like HTTP. A chain wait occurs, and waits for the request to come back, where the result is the View.
On the first iteration of Calligraphy, the onCreate View method intercepted the View. This initial concept worked only for normal Views, but not non-custom ones. It never intercepted views created by Factories, meaning AppCompat and Fragments could not be done.
The next iteration of Calligraphy was slightly better and did this:
class CalligraphyLayoutInflater extends LayoutInflater {
	{
    	setFactory2(new CalligraphyFactory2Wrapper(getFactory2()));
    	setPrivateFactory(
        	new CalligraphyPrivateFactoryWrapper(getPrivateFactory()));
	}
	@Override
	protected View onCreateView(name, attrs){
    	view = super.onCreateView(name, attrs);
    	return mCalligraphyFactoryWrapper
        	.onViewCreated(view, view.getContext(), attrs);
	}
}
It intercepts all Factories, and it respects the Factories already set, which is important because some people will create a Layout Inflater and set the Factories. But, this still does not support Custom Views.
To solve this, we changed the Inflation Flow.
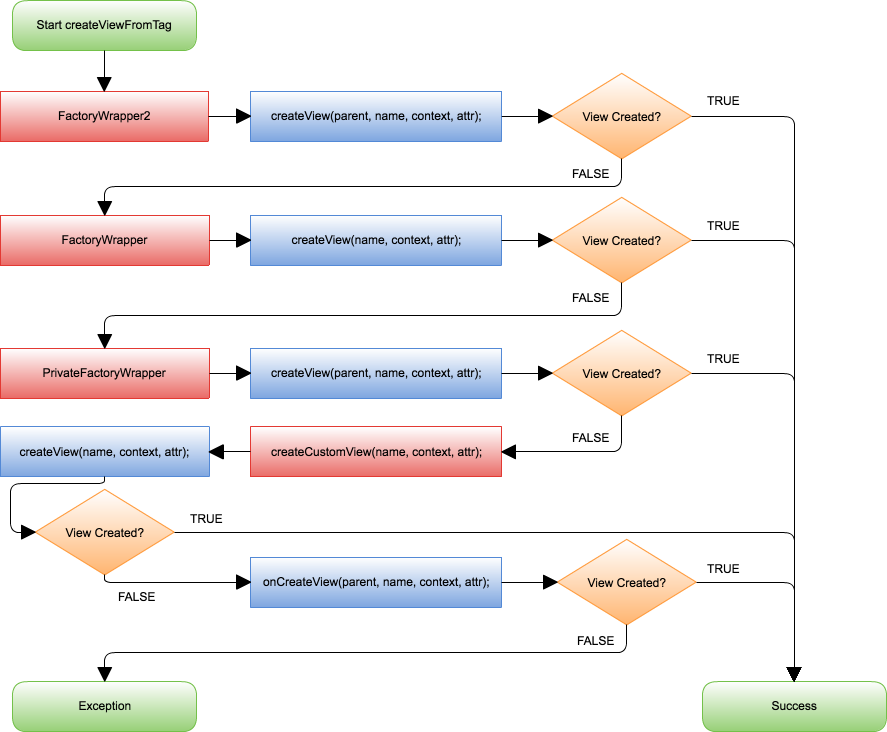
When we create a View, we go through all the wrappers to the Private Factory, which is the one that wraps the Activity.
We changed the flow, which will answer Private Factory to create the View, if it doesn’t, we create the Custom View. We’re doing the Custom View Inflation one step earlier.
Then it gets passed through to the underlying layer of the LayoutInflater mechanism.
What does that Create Custom View do?
Reflection, but the reason we have to do reflection here is because the Layout Inflater was designed to prevent people from doing stupid stuff. The Create View doesn’t take a constructor.
private View createCustomView(View parent, View view, String name,
      		Context viewContext, AttributeSet attrs) {
		// Is this a custom view?
		if (view == null && name.indexOf('.') > -1) {
      		if (mConstructorArgs == null)
          mConstructorArgs = ReflectionUtils
              	.getField(LayoutInflater.class, "mConstructorArgs");

      		final Object[] mConstructorArgsArr =
            	(Object[]) ReflectionUtils.getValue(mConstructorArgs, this);
      		final Object lastContext = mConstructorArgsArr[0];
      		// Have to set the correct context to the View constructor args, because
      		// they can't be passed in.
      		mConstructorArgsArr[0] = viewContext;
      		ReflectionUtils.setValue(mConstructorArgs, this, mConstructorArgsArr);
      		try {
         		 view = createView(name, null, attrs);
      		} catch (ClassNotFoundException ignored) {
      		} finally {
          		mConstructorArgsArr[0] = lastContext;
          		ReflectionUtils.setValue(mConstructorArgs, this, mConstructorArgsArr);
      	}
}
Why go through all this hassle?
We’re now able to do font injection, and it works everywhere. I can create all these Views in code by myself, and I can apply these attributes.
What can I use the Inflation Hooks for?
One example is if you’re trying to debug, you can intercept Views and replace it with your own view. Or like in the previous example, which was wanting to inflate prefixed text.
If you do not set accessibility in a Text View, you make it disappear. This is aggressive, but your developers will start adding accessibility to Views as a result.
	public InflateResult intercept(Chain chain) {
		InflateResult result = chain.proceed(request);
		View view = result.view();
		// Maybe a little aggressive.
		if(view.getContentDescription().isEmpty()) {
    		view.setVisibility(View.GONE);
		}
		return result;
	}
About the content
This talk was delivered live in March 2017 at DroidKaigi. The video was recorded, produced, and transcribed by Realm, and is published here with the permission of the conference organizers.


