Overview
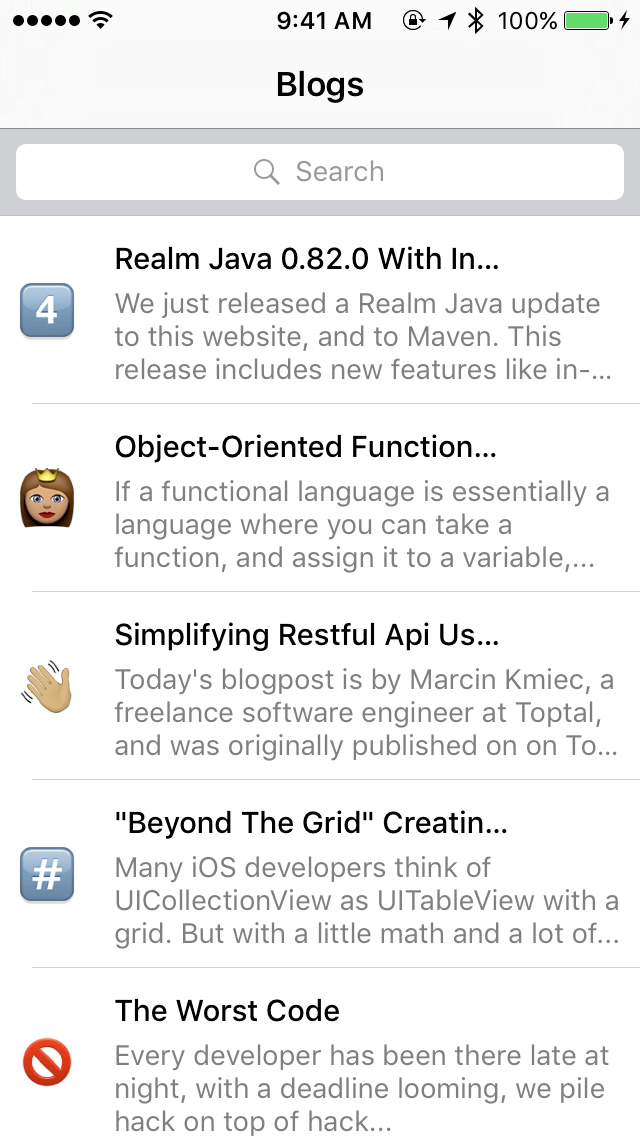
It’s called the “Google Effect” and users are now trained to expect data to be readily at their fingertips. Don’t force your users to wait for search results, instead, this tutorial will show you how to implement RealmSearchViewController: very fast and non-blocking, revealing results as you type search interface for data in Realm:
Let’s get started, but if you want to jump to the end product, you can see the final code on GitHub here.
If you are looking for an Objective-C version, you can check out the tutorial for ABFRealmSearchViewController, which has an identical API.
Tutorial
Create a new Xcode project, using the “Single View Application” template. Be sure “Language” is set to Swift, and that “Use Core Data” is unchecked.
RealmSearchViewController is available through CocoaPods. (If you don’t have CocoaPods installed, follow their instructions before continuing.) In your terminal, cd to the project folder you just created, and open your Podfile. To install RealmSearchViewController, simply add the following lines to the Podfile you just created:
use_frameworks!

pod 'RealmSearchViewController'

# We will also be using a few more pods too:
# Easy UIViewController to display website
pod 'TOWebViewController'

# Pre-built data model with data culled from Realm.io Blog
pod 'RealmSwiftBlogData'
In your terminal, run pod install. This will also install Realm Swift automatically! (If this is your first time using CocoaPods, this could take a while. Future uses will be much faster.)
When it’s done, you’ll need to close the Xcode window and open the xcworkspace file that CocoaPods created, so that you can use the classes inside the pods.
Go to Main.storyboard and delete the view controller that was generated (you can also delete ViewController.swift). Drag in a UINavigationController. This will also create a UITableViewController as its root view controller. On your newly added UINavigationController, be sure to check “Is Initial View Controller” in the right side bar.
Next, create a new class called BlogSearchViewController and have it inherit from RealmSearchViewController. In the new file make sure to add:
import RealmSearchViewController
Go back to Main.storyboard, click the UITableViewController and change its “Class” (in the Identity Inspector, at the top right) to BlogSearchViewController.
Since this is a subclass of RealmSearchViewController, we can now set its data-binding properties. Click the attributes tab and for “Entity Name”, type “BlogObject”. For “Search Property”, type “title”. (Be sure to hit Enter after typing each one to confirm it.) Set “Use Contains” to “On”.
Finally, click on the table view cell and change its reuseIdentifier to “blogCell”. (Be sure to hit Enter after typing it to confirm.) Here’s a video detailing all of these steps:
Now go to AppDelegate.swift. and add import RealmSwiftBlogData to the top. The RealmSwiftBlogData framework requires that you load the data into a Realm file. For simplicity there is a class method on BlogObject that will do this for you. Just add these lines to viewDidLoad()
import RealmSwiftBlogData
import RealmSwift

@UIApplicationMain
class AppDelegate: UIResponder, UIApplicationDelegate {

    var window: UIWindow?

    func application(application: UIApplication, didFinishLaunchingWithOptions launchOptions: [NSObject: AnyObject]?) -> Bool {
        // Override point for customization after application launch.

        if try! Realm().objects(BlogObject).count == 0 {
            BlogObject.loadBlogData()
        }

        return true
    }

...

}
We now have the storyboard setup and our blog data imported, but we now need to implement a data source method that will configure the UITableViewCells for display. Add these lines to BlogSearchViewController:
import RealmSwiftBlogData
import RealmSwift
...

override func searchViewController(controller: RealmSearchViewController, cellForObject object: Object, atIndexPath indexPath: NSIndexPath) -> UITableViewCell {

        let cell = self.tableView.dequeueReusableCellWithIdentifier("blogCell", forIndexPath: indexPath)

        if let blog = object as? BlogObject {
            cell.textLabel?.text = blog.title.capitalizedString
        }

        return cell
}
Now if you run this now, you should see a list of blog posts! You’re pretty much done at this point; grab some coffee or a beer and celebrate! In the next part, we’ll go over how to style this so it looks similar to the example above.
First, create a custom table view cell called BlogPostTableViewCell, inheriting from UITableViewCell. Leave as “Also create XIB” unchecked as we will use the storyboard.
Go to Main.storyboard and increase the height of the cell to 88 by clicking and dragging the handle at the bottom. Then add 3 UILabels, which will represent title, emoji, and content. Style them however you’d like! Just be sure to set “Number of Lines” on the content label to 0, so that more than one line of text will show.
Next, set up the Auto Layout constraints as shown in the video below. We won’t go into Auto Layout too much in this tutorial, since we only need the basics. If you’re interested in learning more about Auto Layout, check out some of these great resources!
The video demonstrates how to create a prototype cell in the Storyboard, configure the look of the various labels, and then create IBOutlet’s: titleLabel, emojiLabel, and contentLabel, on BlogPostTableViewCell.
Now let’s utilize this new cell. Go back to BlogSearchViewController.swift and update the search controller data source method:
override func searchViewController(controller: RealmSearchViewController, cellForObject object: Object, atIndexPath indexPath: NSIndexPath) -> UITableViewCell {

        let cell = self.tableView.dequeueReusableCellWithIdentifier("blogCell", forIndexPath: indexPath) as! BlogPostTableViewCell

        if let blog = object as? BlogObject {
            cell.emojiLabel.text = blog.emoji

            cell.titleLabel.text = blog.title

            cell.contentLabel.text = blog.content
        }

        return cell
}
We also need to configure the table view to automatically size our rows, add these lines in viewDidLoad():
override func viewDidLoad() {
        super.viewDidLoad()

        self.tableView.estimatedRowHeight = 88
        self.tableView.rowHeight = UITableViewAutomaticDimension
}
Finally, let’s add a finishing touch to pull up the blog from Realm’s website. Recall, we installed, TOWebViewController via CocoaPods, so add import TOWebViewController to BlogSearchViewController and then add this search view controller delegate method:
override func searchViewController(controller: RealmSearchViewController, didSelectObject anObject: Object, atIndexPath indexPath: NSIndexPath) {
        controller.tableView.deselectRowAtIndexPath(indexPath, animated: true)

        if let blog = anObject as? BlogObject {
            let webViewController = TOWebViewController(URLString: blog.urlString)

            let navigationController = UINavigationController(rootViewController: webViewController)

            self.presentViewController(navigationController, animated: true, completion: nil)
        }
}
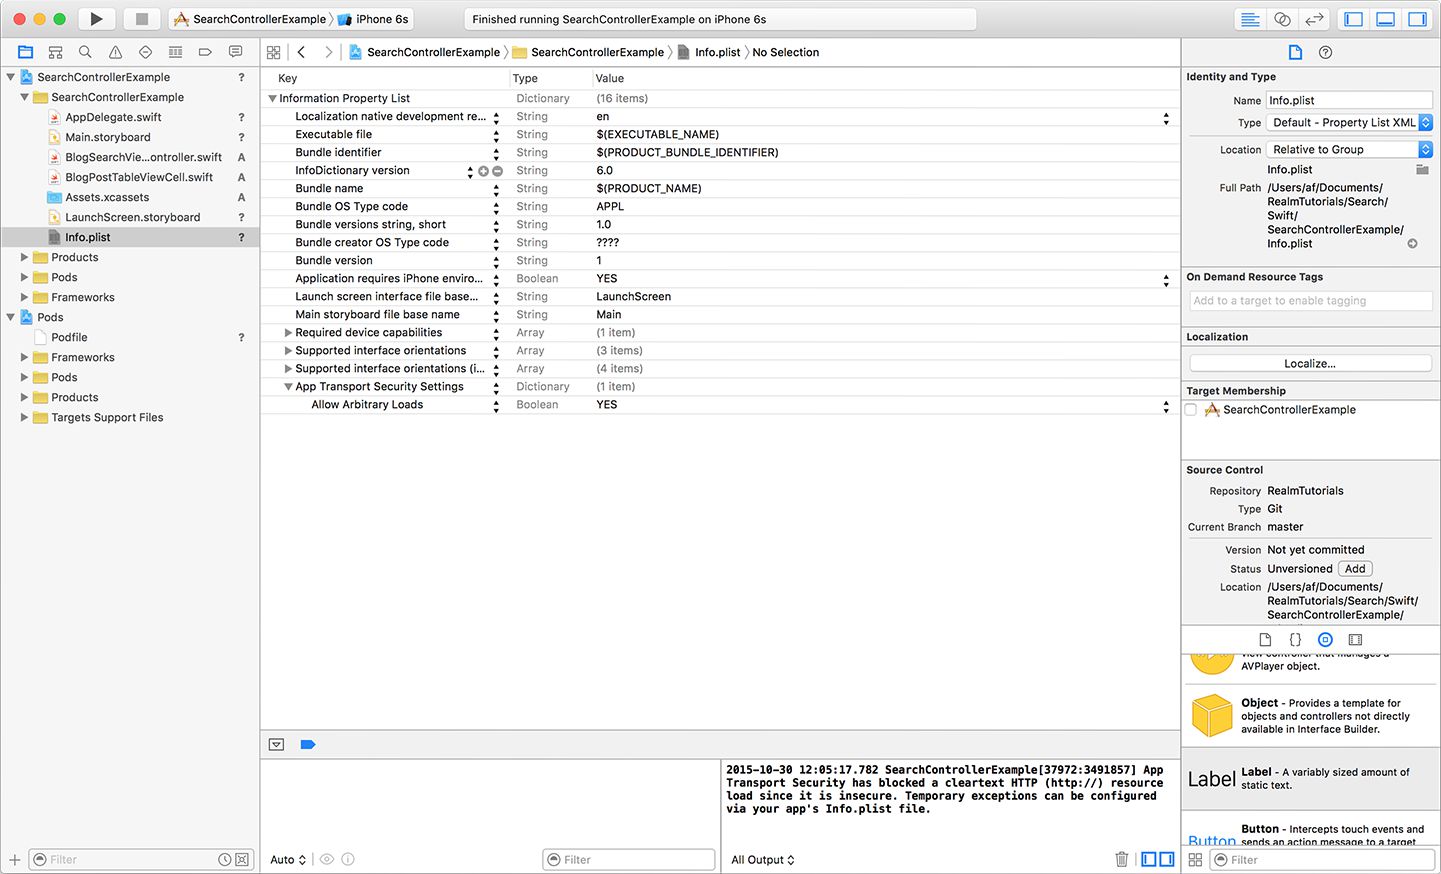
To make sure you can load the website URLs, starting with iOS 9 we need to add an exemption for non-secure URLs in Info.plist. Add a dictionary entry for “App Transport Security Settings” and then within the dictionary add a Boolean value of YES for the key “Allow Arbitrary Loads”.
Fire up the app; you’re done!
About the content
This content has been published here with the express permission of the author.


