

What is Xamarin? (1:53)
Xamarin lets you create mobile applications using the .NET framework, and as a result gives you performance along with look and feel of a native app.
Xamarin Forms (2:21)
Xamarin Forms is a true cross-platform extension of Xamarin, and is the result of aiming to meet the goal of “writing once, run everywhere.”
Xamarin Forms differs from normal native Xamarin in that Xamarin Forms has shared UI layers that allows for reusing up to 100% of the code base against the three platforms, which means it’s not necessary to separate the UI layers between the native levels.
Normally in Xamarin, there’s a shared C# Backend, but it’s necessary to implement the native UI separately for each platform. Xamarin Forms allows code sharing across the three platforms for both the backend and UI.
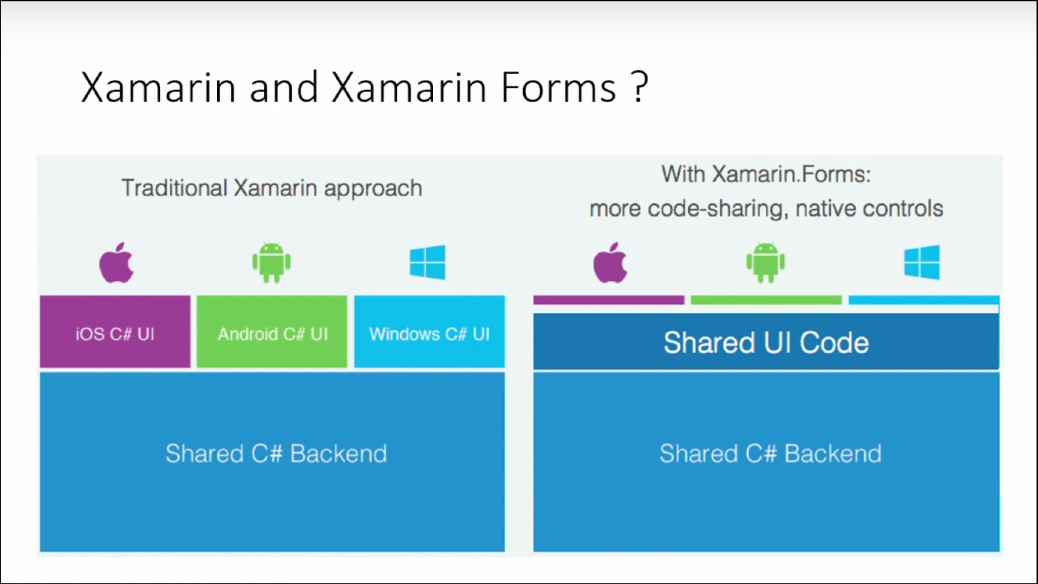
The difference in code sharing between normal Xamarin and Xamarin Froms is 70-80% versus 20-30%.
Xamarin Forms Custom Renderers (6:09)
Xamarin Forms UI rendering [(6:18)
Every control that Xamarin Forms provides has a renderer that’s associated with the native level of the mobile platform, which results in native performance.

This diagram above shows the inter-control of Xamarin text fields. It goes through renderers that Xamarin provides and is converted down to native level controls: iOS - UITextField, Android - EditText, and Windows - UserControl.
Overriding the rendering process (7:35)
Xamarin has allowed developers to override this rendering process. A user can customize it according to their needs and requirements.
How to access the rendering process? (8:07)
To tap into the Xamarin Forms rendering process, create Custom Renderers by sub-classing the Base Renderers that Xamarin has provided, allowing you to edit the properties and behaviors of those controls.
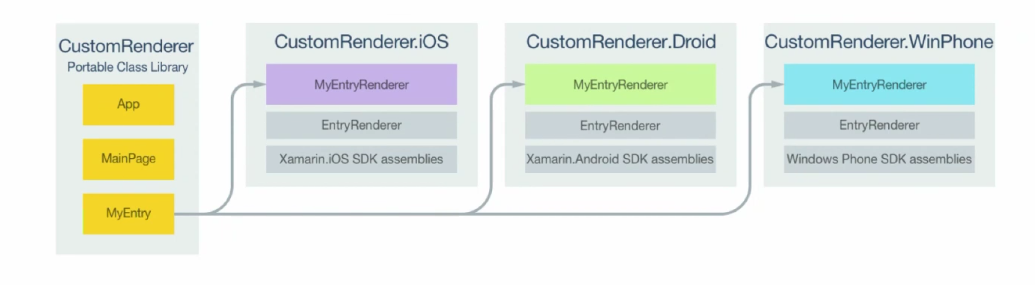
Above, a custom entry is created and derives from the entry control of Xamarin Forms. It goes through the Custom Renderer then to the Base Renderer level. At this level, it can be customized before passing into the base class renderer level.
How a Custom Renderer is Created (9:13)
-
Create a custom control in Xamarin Forms level by sub-classing an ordinary default Xamarin Forms control.
-
Consume the custom control in the UI implementation.
-
Implement the Custom Renderer in the native project level.
Demonstration (10:14)
Let’s use a simple Xamarin Forms project that has a normal label and button. The code can be found online at my github
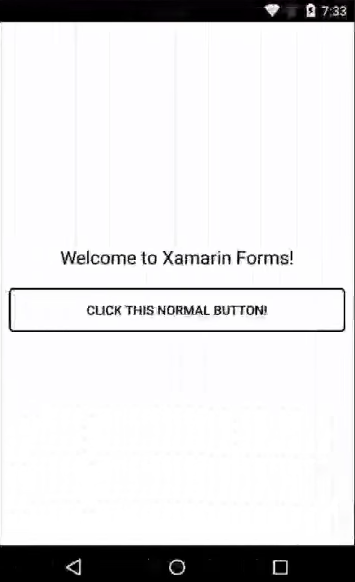
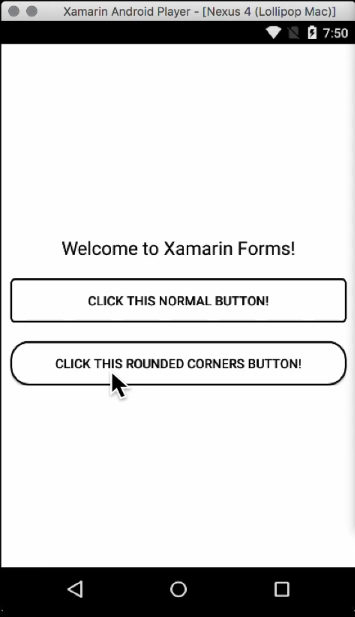
Suppose I need to make the corners of the button more rounded. I implement a Custom Renderer to accomplish this.
1. Create a new class (12:34)
RoundCornersButton will be a public class that inherits the custom control from the default Xamarin Forms button, known as Button from Xamarin.Forms.
namespace CustomRenderersDemo
{
    public class RoundCornersButton : Button
    {
    }
}
2. Consume the control in the UI (13:27)
Next, consume this custom control in the UI implementation.
Children = {
    new Label {
        XAlign = TextAlignment.Center,
        Text = "Welcome to Xamarin Forms!",
        TextColor = Color.Black,
        FontSize = 20,
    },
    new Button()
    {
        Text = "Click this Normal Button!",
        BorderWidth = 2,
        BorderColor = Color.Black,
        BackgroundColor = Color.White,
        TextColor = Color.Black,
    },
    new RoundCornersButton()
    {
        Text = "Click this Round Corners Button!",
        BorderWidth = 2,
        BorderColor = Color.Black,
        BackgroundColor = Color.White,
        TextColor = Color.Black,
    }
}
3. Implement the Custom Renderer at the native level (14:45)
To accomplish this, go into the native Xamarin project level.
Name the class in Xamarin.droid RoundCornersButtonRenderer and make it public. Then subclass the Custom Renderer from ButtonRenderer in the default Xamarin Forms button.
This is also done on iOS and the Windows Phone, and the Custom Renders basic skeleton is complete.
Export Custom Renderers (17:36)
When creating a Custom Renderer, it’s necessary to export and register it with the Xamarin Forms rendering process. Otherwise, Xamarin will not recognize the Custom Renderer and default to the base class renderer.
[assembly:ExportRenderer(typeof(RoundCornersButton), typeof(RoundCornersButtonRenderer))]
This needs to be done on all three platforms.
Override onElementChanged method (19:07)
When a Custom Renderer starts its execution, the first method that gets fired is onElementChanged. In this method is where you can access the properties and perform any customizations.
To note, this method consumes an important parameter called ElementChangedEventArgs with two properties.
NewElementOldElement
NewElement contains a reference to the Xamarin Forms control. OldElement contains a reference to the renderer that the Xamarin Forms control was attached to. It is important to pay attention to the two properties in subscribing and unsubscribing of events to avoid memory leaks.
protected override void OnElementChanged(ElementChangedEventArgs<Button> e)
{
    base.OnElementChanged(e);

    if (e.NewElement != null)
    {
        // Subscribe for events

        e.NewElement.SizeChanged += XFButtonOnSizeChanged;
    }
    else if (e.OldElement != null)
    {
        // Unsubscribe from events

        e.OldElement.SizeChanged -= XFButtonOnSizeChanged;
    }
}
Control and Element (21:44)
A Custom Renderer is an intermediary between the Xamarin Forms and the native level. The hooks (on each side) are called element and control properties.
The element property provides a reference to the Xamarin Forms level control and the control property provides a hook to native level controls. When doing customizations, you need to use the control property to make injections.
if (Control != null)
{
    GradientDrawable gradientDrawable = new GradientDrawable();
    gradientDrawable.SetShape(ShapeType.Rectangle);
    gradientDrawable.SetColor(Element.BackgroundColor.ToAndroid());
    gradientDrawable.SetStroke(4, Element.BorderColor.ToAndroid());
    gradientDrawable.SetCornerRadius(38.0f);

    Control.SetBackground(gradientDrawable);
}
As an example, in Android, the way to set a button’s background is by creating a GradientDrawable.
To set GradientDrawable to the native control, gain access to the control property, and set the background:
Control.SetBackground(gradientDrawable);
The control property has all the required native level methods for this android button. After setting the background, the button now has curved corners.
On iOS:
if (Control !=null)
{
    Control.Layer.CornerRadius = 22;
    Control.ClipsToBounds = true;
}
On Windows Phone:
public class RoundCornersButtonRenderer : ButtonRenderer
    {
        protected override void OnElementChanged(ElementChangedEventArgs<Button> e)
        {
            base.OnElementChanged(e);

            if (e.NewElement != null)
            {
                // Subscribe for events

                e.NewElement.SizeChanged += XFButtonOnSizeChanged;
            }
            else if (e.OldElement != null)
            {
                // Unsubscribe from events

                e.OldElement.SizeChanged -= XFButtonOnSizeChanged;
            }
        }

        private void XFButtonOnSizeChanged(object sender, EventArgs eventArgs)
        {
            // Credits for the code : http://www.wintellect.com/devcenter/jprosise/supercharging-xamarin-forms-with-custom-renderers-part-2
            Control.ApplyTemplate();
            var borders = Control.GetVisuals<Border>();
            var radius = Math.Min(Element.Width, Element.Height) / 2.0;

            foreach (var border in borders)
            {
                border.CornerRadius = new CornerRadius(radius);
            }
        }
    }

    // Credits for the code : http://www.wintellect.com/devcenter/jprosise/supercharging-xamarin-forms-with-custom-renderers-part-2
    static class DependencyObjectExtensions
    {
        public static IEnumerable<T> GetVisuals<T>(this DependencyObject root)
            where T : DependencyObject
        {
            int count = VisualTreeHelper.GetChildrenCount(root);

            for (int i = 0; i < count; i++)
            {
                var child = VisualTreeHelper.GetChild(root, i);

                if (child is T)
                    yield return child as T;

                foreach (var descendants in child.GetVisuals<T>())
                {
                    yield return descendants;
                }
            }
        }
    }
In the Windows Phone renderer, what we do is we check for the presence of OldElement and the NewElement and we are using the method - the Xamarin Forms stable event here. Moreover we are subscribing and unsubscribing to that event based on the presence of these two properties. These customizations depend on each platform’s controls.
Getting rid of the default native control (30:23)
Suppose you want to remove the default native control, this can be accomplished by accessing the native control method that is availble in Custom Renderers and override them.
Creating Base Renderers (32:17)
To create a custom renderer, use the default ViewRenderer that is provided by Xamarin and use the generic ViewRenderer, then pass the custom control and the native control that’s going to associate with your own renderer.
Things to Keep in Mind For a Custom Renderer Implementation (34:05)
1. A second look (34:29)
Because Custom Renderers are process intensive, solving the requirement from the Xamarin Forms level itself can save resources and processing time. See Xamarin Forms effects. This is something similar to Custom Renderers but it is more simplified and less process intensive. Always look for the alternatives before moving towards renderers.
2. Reusability (35:34)
When creating a Custom Renderer, it’s important to focus on reusability because of the fact that it’s process intensive. Try to merge renderers together, and keep the number of renderers as low as possibile.
3. Look at available properties in the render hierarchy (36:45)
Before a renderers implementation, try to take a look at the renderer hierarchy starting from the Xamarin Forms level towards the actual native control level. Go through the properties that are available at the native level in all three platforms before deciding to go use Custom Renderers.
About the content
This content has been published here with the express permission of the author.