


If you enjoy talks from 360 AnDev, please support the conference via Patreon!
Today, beautiful, meaningful motion is simpler and more powerful than ever. Nick Butcher and Doris Liu take us on a deep dive into the latest developments: physics-based animations, animated vectors, transitions and more. They demonstrate the latest libraries, APIs, and tools and show real-life examples of making apps more understandable and engaging through motion.
Introduction
In this talk, we’ll cover advanced Android animation. My name is Nick Butcher, I am a design and developer advocate at Google. I help people design and build awesome Android apps, and I have a special focus on animation and motion design.
And my name is Doris Liu. I work on the Android UI Toolkit team. My primary focus is the animation framework, including AnimatedVectorDrawable, ObjectAnimator, ValueAnimator, and also the new physics-based animation library.
Why Use Animation?
Animation can help your application go from okay, to good, to great. It can make you stand out in a crowded market. Animation doesn’t just add fluffy things like whimsy and delight. I genuinely think that animation can help guide a user’s focus. It can help ease their journey through the application and explain what they should be doing next, or how they got to this state. Animation is an important part in polishing and making your application shine.
Animation is Easier!
Animation has been hard to build in the past. You had to use low-level components and plug things together yourself. But things have gotten better, and there are new libraries, tools, and frameworks which you can use in your applications to achieve impressive motion design effects. Today our goal is to take you through some of the latest developments in order to make your applications beautiful and utilize motion design.
AnimatedVectorDrawable
First, let’s look into the AnimatedVectorDrawable API.
Review of Vectors
To understand how to build AVDs, you first need to understand VectorDrawable. The vector is an XML format for defining your images. It contains a vector and one or many path elements within it, like so:
<vector xmlns=...
	android:width="24dp"
	android:height="24dp"
	android:viewportWidth="24"
	android:viewportHeight="24"
	<path
		android:name="cross"
		android:pathData="M6.4,6.4 L17.6,17.6 M6.4,17.6 L17.6,6.4"
		android:strokeWidth="2"
		android:strokeLineCap="square"
		android:strokeColor="#999" />
</vector>
The vector has an intrinsic size, much like a raster asset. For example, a bitmap might have an intrinsic size, but also has a viewport size, and these numbers don’t have to match. The viewport size is like the coordinate space in which all the parts are defined.
The above is actually a simple schema. The letters and numbers are saying “pick up your pen and move it here, and then draw a line to these coordinates, and then pick the pen up, and move it over here, and draw a line over there.”
A path itself doesn’t actually show anything on the screen, and you have to stroke or fill it. Here, I’m drawing a stroke which is going to go around the outside of the shape.
Beyond individual paths, of which you can have many, you can also group these paths together. The groups are useful for performing transforms onto them. You can set things like pivots in order to rotate, or scale around that pivot, or make x and y translations.
The last feature of vectors is the trim path. If you define a path, it could be a really long line. Instead, you can draw just portions of it by using trim path. For example, if you set a trimPathStart of zero and trimPathEnd of one, that means don’t trim it at all. If you set a trimPathEnd of 0.75, it’s going to draw the first 75%. A trimPathStart of 0.5 is going to draw from halfway to 75% away, and so on:
	<path ...
		android:trimPathStart="0.5"
		android:trimPathEnd="0.75"
		android:trimPathOffset="0.375"
	/>
The last attribute there is trimPathOffset, which takes the trim values and offsets them, and the line will wrap around so that just the start and end of the line are drawn.
Deep Dive into Animated Vectors
An animated vector is a collection of three things. It’s composed of three separate files that you have to create per animation.
The first is a link between the two other things. It defines a VectorDrawable, which will be animated, and it targets animations on each of the paths or groups of the Drawable.
There’s an alternative to separating it into three files - inline resource format lets you specify all three of these things in a single file. At build time the AAPT will extract the vector, create a new file, and insert a reference to the parent node.
Almost all of the attributes of the VectorDrawable can be animated: on a path you can do the color and opacity, on the trims and the path and on groups you can translate, scale and rotate.
Path Morphing
Getting a bit more in-depth: Path morphing is one of the most powerful and interesting effects you can build, but it’s also one of the most complicated. When you do a path morph animation, you’re animating the path data property, and you have to give it these two values, the “from” and “to”; from this exact path to this other exact path. But unless you are careful, this can lead to an Exception:
InflationException:
Binary XML file line #3 Can't morph from ... to ...
Binary files actually can’t morph from this to this other thing…. The reason is that it’s a fairly simple system. We want to linearly interpolate from between each pair of points. So, from the “from” shape to the “to” shape. Therefore, there’s a requirement on you to supply paths which are compatible, which means that they have to have the same number and type of drawing commands.
Suppose you’re going to morph a path from a small square to a large square:
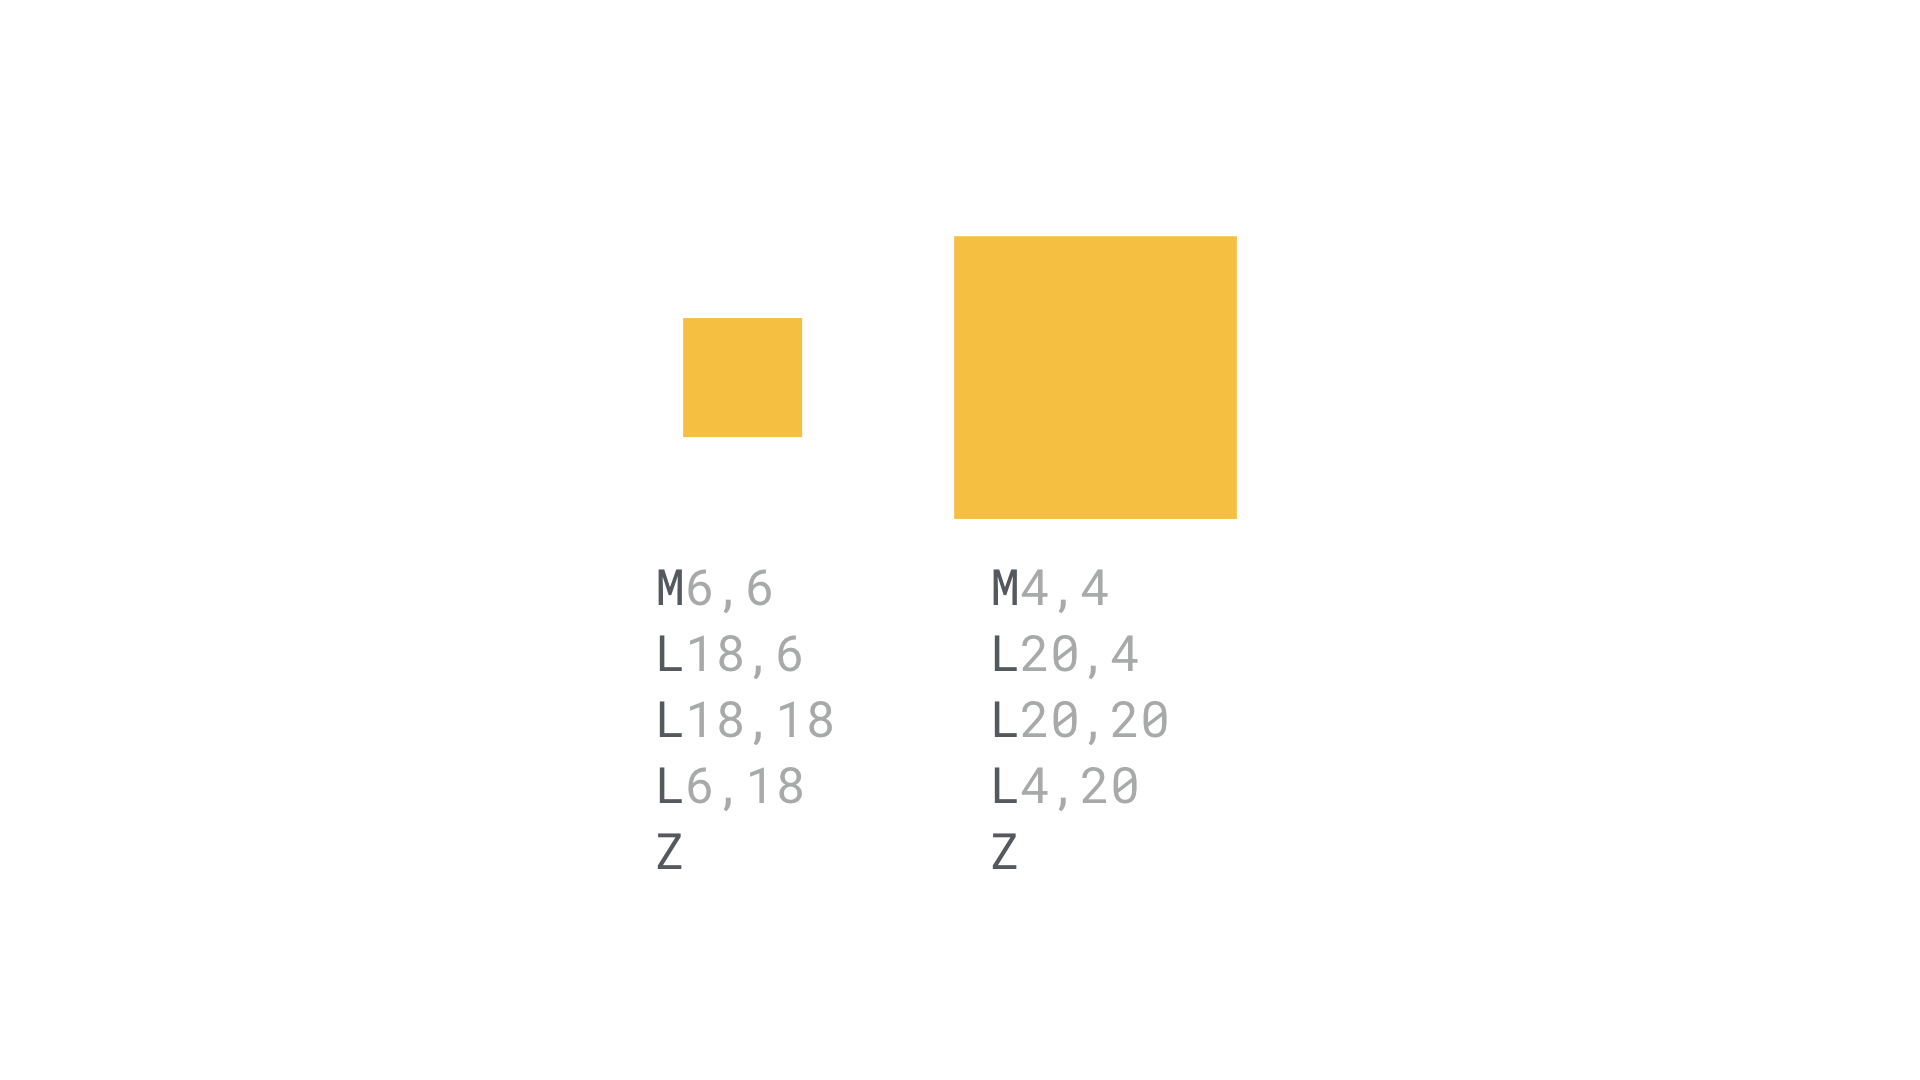 You can see that these two squares have the same number and same type of drawing commands - this would be considered a compatible path.
What happens if you go from a square to a circle, or a square to a triangle, or a square to a weird clip path that makes an eye disappear?
You need to make them compatible; you split up the path into subpaths, such that they have the same number of plot points. If we’re drawing a square, we’d have to split the circle into four points. For them to be the same type of command, the command for drawing the arc on the circle is going to be the curve command.
There is an issue. How do you create these things as inputs to Android? You’re not going to say “I want to go from a square to a circle, you figure it out!”
We have to generate the paths.
First off, when you’re drawing, the “from” and “to” states, you’re probably going to use a graphics package, such as Sketch or Photoshop or Illustrator to produce an SVG. Then, you’re using importers to send out to VectorDrawable. In this process, you don’t get much control over where the path points are. Design tools do not expose where all the points are, and the current tooling isn’t great for doing this kind of work!
Luckily, there’s a new awesome kid on the block! Shape Shifter is a web tool which will help you with these problems. Using a previous example, I’m going to morph a plus to a minus.
I can drop in the two SVGs into my canvas. It’s basically a web-based IDE for creating animated vectors. If I grab that path data, copy it to the clipboard, then click on the clock symbol, you can see the different animations. I can grab the path data, fill, colors, etc. - all those things we looked at.
AVD: Behind the Scenes
In Android N, we wrote the entire VectorDrawable in native. With this rewrite, we have seen some significant performance improvements. We are seeing an improvement of 80% for path parsing. This is important because path parsing happens during inflations, and inflation involves lots of work, such as loading and parsing resources, creating necessary data structures, creating views, adding views to the view hierarchy, etc.
In Android N-MR1 we moved AnimatedVectorDrawable onto RenderThread. Simply put, RenderThread is a background thread that is responsible for generating frames, and the RenderThread has cached draw commands that were issued from the UI thread. By moving AnimatedVectorDrawable onto RenderThread we’re able to continue to animate the AnimatedVectorDrawable, even when the UI thread is stalled.
To demonstrate the difference, I have the same app running on two Android releases. The app on the left uses the old AnimatedVectorDrawable that was running on the UI thread, while on the right it’s using RenderThread plus AnimatedVectorDrawable. On the top part of the app is the progress bar, and on the bottom is a RecyclerView with things to purposely slow it down. As I scroll the RecylerView, struggles to produce frames. But if you pay attention to the progress bars, you will notice on the right, the progress bar on RenderThread continues to animate at a high frame rate. In contrast, the progress bar on the UI thread is dropping a significant number of frames.
Putting the two systrace snapshots side by side, we can see on the bottom, even though the UI thread has been choppy the entire time, RenderThread keeps producing frames at a really high frame rate:
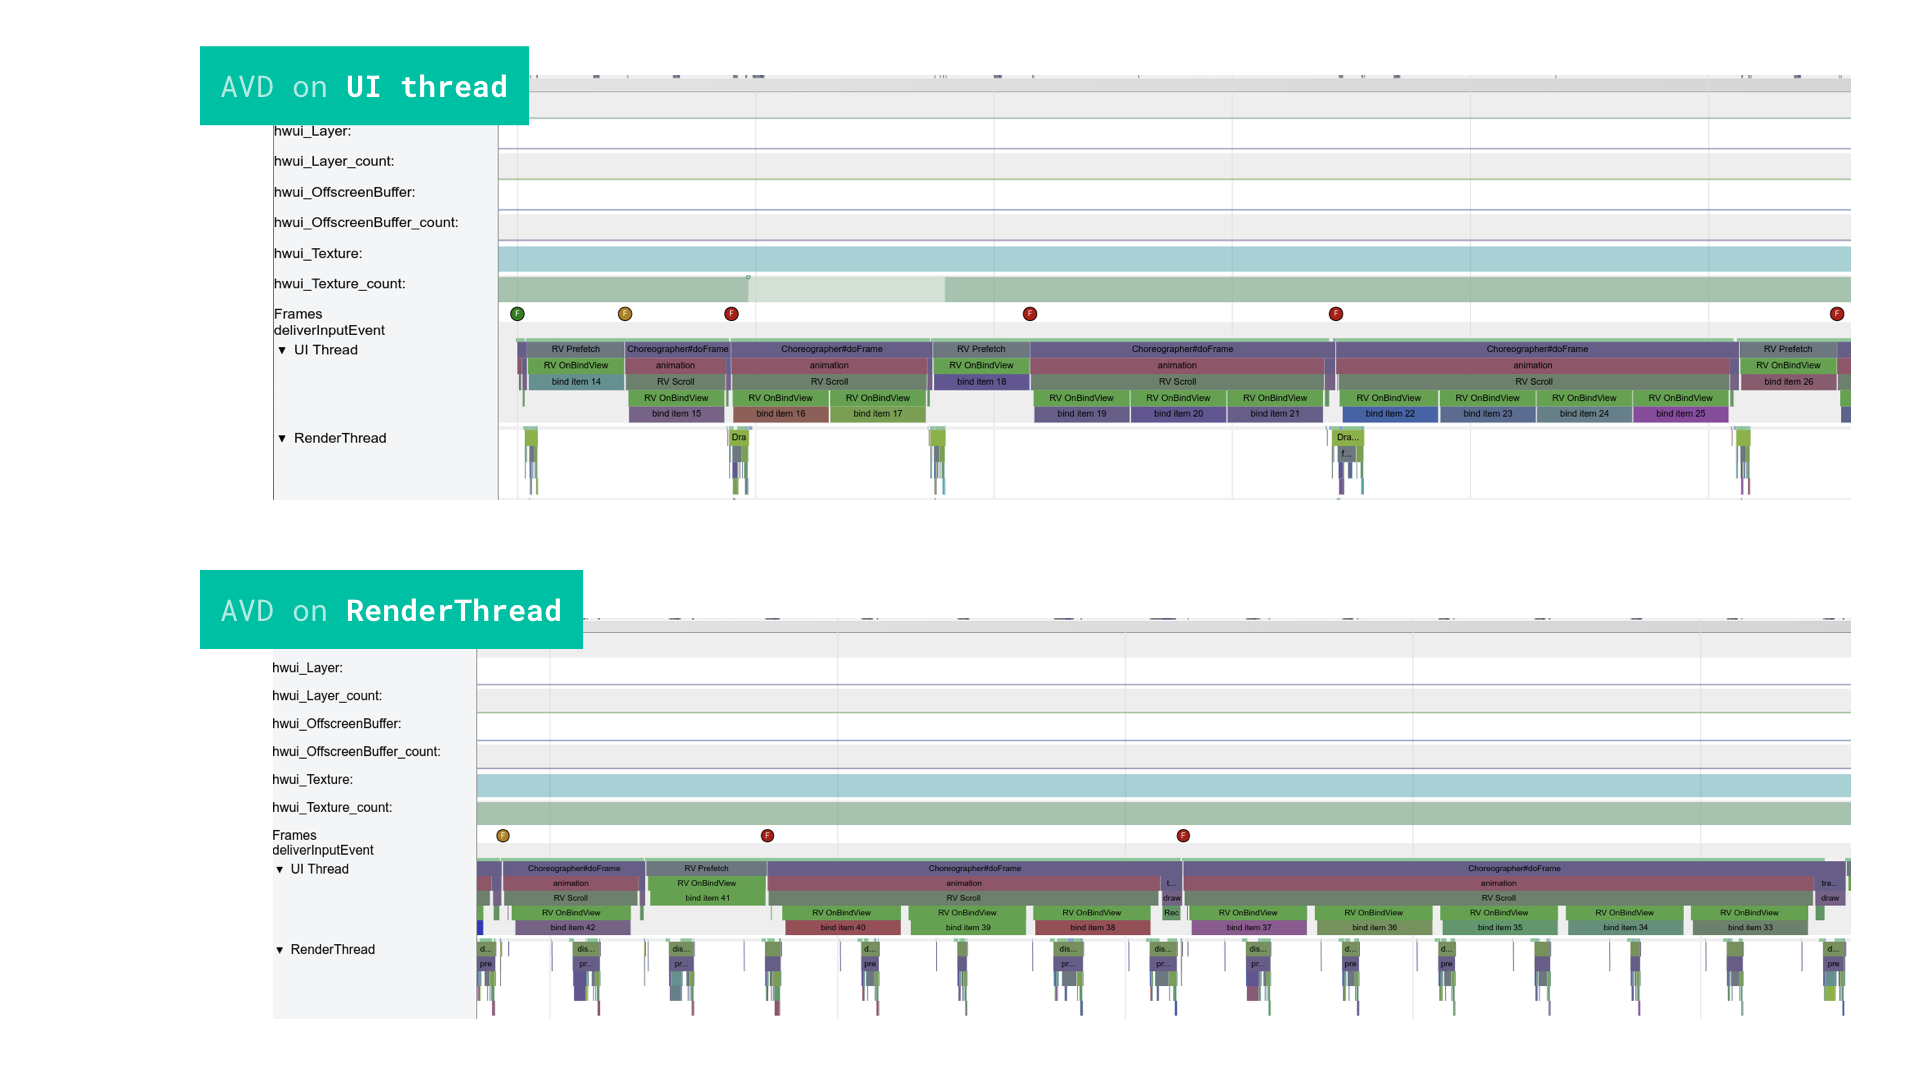 This is critical for keeping a smooth
 AnimatedVectorDrawable, even when the UI thread is stalled with lots of work. The best part is this comes for free if you have apps running in N-MR1 or later releases using AnimatedVectorDrawable or AnimatedVectorDrawableCompat. There’s nothing that needs to be done on the app side to take advantage of this newly improved AnimatedVectorDrawable.
Lottie
Lottie is a vector animation library from Airbnb.
One of the great things about Lottie is the workflow - it’s like a toolchain based on After Effects, an Adobe motion design tool. This workflow allows incredibly talented people to make complicated After Effects files, which Lottie will support.
AVD is “fire and forget” - the API surface is basically starting and stop. Whereas Lottie lets you control the progress of the animation.
The Lottie demo has a nice onboarding wizard. As you swipe through the onboarding pages, it controls the animation behind it. Lottie can be a good decision when building apps. I wrote up a blog post about Lottie.
Tools Not Rules
I want people to take away from this: “tools not rules.” As in, the take away should not be that Lottie is bad, and AVD is good. Each has different performance characteristics and are good at certain things. For some of the complicated animations that we shipped, I wouldn’t want to re-implement those as AVDs because it would take forever.
But a motion designer working in After Effects was super important to those compositions. So in that case, Lottie worked out really well. In contrast, for something where performance is absolutely crucial, or say it’s something tiny, for example, a RecyclerView, each of which has an animated heart button - there will be many instances of that view in your hierarchy. It will be much more performant and lightweight in AVD, rather than instantiating Lottie every time for that, even though Lottie does some caching.
Know your tools, and know which is the right one for the right job, and proof all your code.
Physics-Based Animation Library
We’ve introduced the physics-based animation library earlier this year. The goal is to create natural looking continuous motion. The key to natural looking motion is to use a physics force to govern the movement of the animation, that is, F = ma.
Fling animation is an animation introduced inside of this physics-based animation library. Its name indicates it’s usually triggered by a fling gesture. The motion will start with the same velocity as the fling gesture, and then will be influenced by a friction force which slows it down and eventually stops it.
To create such a Fling animation:
- Supply the object that you want to animate to the constructor of the
FlingAnimation. - In order to carry over that momentum, set the start velocity to be the same velocity as the fling gesture.
FlingAnimation fa = new FlingAnimation(bottomSheet,
  DynamicAnimation.TRANSLATION_Y);
fa.setStartVelocity(velocityY)
	.setMinValue(minTranslation)
	.setMaxValue(maxTranslation)
	.start();
Friction
You can add friction by adding the method setFriction.
Spring Animation
To create a Spring animation, you need to supply an object to the constructor of the Spring animation and the property for the object being animated. Here, we’re using a View and a translation Y as the property for the animation. The third parameter, zero, is the optional resting position of the spring:
SpringAnimation anim = new SpringAnimation(view,
	DynamicAnimation.TRANSLATION_Y, 0);
anim.start();
You can also adjust the damping ratio and the spring constant/stiffness like so:
SpringAnimation anim = new SpringAnimation(view,
	DynamicAnimation.TRANSLATION_Y, 0);
anim.getSpring().setDampingRatio(
	SpringForce.DAMPING_RATIO_NO_BOUNCY).
	setStiffness(SpringForce.STIFFNESS_HIGH);
anim.setStartValue(200)
	.setStartVelocity(3000)
	.setMinValue(-10)
	.start();
We have stiffnesses from low to high. As you can see, as the stiffness gets higher and higher, the animation goes back to its resting position much faster. There are four pre-defined constants for stiffness:
STIFFNESS_VERY_LOWSTIFFNESS_LOWSTIFFNESS_MEDIUMSTIFFNESS_HIGH
You can use any of these four, depending on which look you like the best, or you can fine-tune the value to use something that’s between these for your particular app.
Real World Spring Animation Example
Now let’s take a look a more real-world example. Here, there are four icons on the top, and I’m using animation to pop them in, where they’ll grow and shrink, then oscillate.
To create an animation that achieves this effect, we could just create Spring animations on the scaleX and scaleY property, but a more advanced way to do it is to create a property/uniform scale. So, whenever this scale changes, I wanna change the scaleX and scaleY simultaneously.
To define such a custom property, we define the setter and getter. In the setter, whenever the scale changes, I want to apply the new scale to both the scaleX and the scaleY property of the View. In the getter, because we assume scaleX and scaleY were changed at the same time, they will always be equivalent. So I’ll just return scaleX:
FloatPropertyCompat<View> scale = new FloatPropertyCompat<View>(..) {
	@Override
	public void setValue(View view, float value) {
		view.setScaleX(value);
		view.setScaleY(value);
	}

	@Override
	public float getValue(View view) {
		return view.getScaleX();
	}
};
Now that we have the custom property, we can iterate through the list of icons. For each icon, we’ll create one Spring animation on its uniform scale property. The last parameter, a float, means eventually we want our scale to be one when it’s resting.
ViewGroup vg = (ViewGroup) findViewById(R.id.tab_icons);
for (int i = 0; i < vg.getChildCount() - 1; i++) {
	View v = vg.getChildAt(i);
	SpringAnimation anim = new SpringAnimation(v, scale, 1f);
	anim.getSpring()
		.setStiffness(SpringForce.STIFFNESS_LOW)
		.setDampingRatio(0.35f);
	anim.setMinimumVisibleChange(DynamicAnimation.MIN_VISIBLE_CHANGE_SCALE)
		.setStartVelocity(10f)
		.start();
}
Combining Spring and Fling Animation
We’re going to use the same Fling animation as we did before, except this time we’re going to add an OnAnimationEndListener. This OnAnimationEndListener will receive a callback once the animation finishes.
There are two different scenarios that a Fling animation can end with, one is when it stops naturally, meaning, the velocity reaches zero. The other is when it hits the bounds that we have defined with the set min value and set max value.
To filter for the second scenario we’re going to check its velocity. If this velocity exceeds a certain threshold, we assume that there is still some momentum left, and we want to have a Spring animation to carry over that momentum.
flingAnimation.addEndListener(
	new DynamicAnimation.OnAnimationEndListener() {
		@Override
		public void onAnimationEnd(
			DynamicAnimation animation, boolean canceled, float value, float velocity) {
				if (!canceled && Math.abs(velocity) > 200) {
					SpringAnimation sa = new SpringAnimation(bottomSheet,
						DynamicAnimation.TRANSLATION_Y, value);
					sa.setStartVelocity(velocity);
					sa.start();
				}
		}
	}
});
The physics-based animation library is available now. The Spring animation was introduced in support lib 25.3. The Fling animation was introduced later in 26.0.0-beta1. To use the animation, you need to add this dependency to your gradle file, and the animation library is backward compatible to API 16.
About the content
This talk was delivered live in July 2017 at 360 AnDev. The video was recorded, produced, and transcribed by Realm, and is published here with the permission of the conference organizers.


