
Nicolas는 여러 해 동안 Google의 다양한 프로젝트에 참여해 온 개발자입니다. 안드로이 브라우저의 HTML5 지원과, 허니콤 버전 웹뷰의 하드웨어 가속 지원, 젤리빈과 킷캣에 적용된 크기를 조절할 수 있고 원본을 훼손하지 않는 포토 에디터 등이 그의 작품이죠. 잠시 로봇을 위한 초고속 텔레메트리 시스템을 구축한 이후, 다시 안드로이드로 돌아와 ConstraintLayout을 개발했습니다. 덕분에 이제 Android Studio 레이아웃 편집기에서 ConstraintLayout을 사용할 수 있습니다.
소개 (0:00)
저는 Googl에서 근무하고 있으며 안드로이드 프레임워크를 제작하고 있습니다.
지난 1년 반 동안 저는 ConstraintLayout을 제작했습니다. 주로 개발 도구를 제작했지만, 개발자로서의 경험도 좀 있습니다. ConstraintLayout를 만든 목표는 개발자를 돕기 위해서죠.
왜 ConstraintLayout을 도입했을까요? (0:45)
2016년 5월에 개최된 Google I/O를 보셨다면, 레이아웃 에디터를 기억하실 겁니다. 이 에디터에 ConstraintLayout를 상호 연관시키기 위해 도입하게 됐습니다.

새로운 에디터를 개발하면서 저는 정말 강력하고 사용하기 쉬운 도구가 되길 바랬습니다. 이를 위해선 ID로 작업하기 쉽도록 좀 더 강력하고 유연한 뷰그룹이 필요했습니다. 그 결과 매우 유연한 ConstraintLayout를 만들 수 있었습니다. 특히, 단순한 계층 구조로 만들어낼 수 있다는 장점이 있습니다.
또한 ConstraintLayout이 번들되지 않는 라이브러리라는 점이 개발자와 라이브러리 제작자가 눈여겨봐야 할 점입니다. 개발자가 완전히 통제할 수 있다는 것이 장점이죠. 뭔가를 읽었다면 바로 이해하고 결정할 수 있습니다. 여러분에게 맞는 버전을 사용할 수도 있습니다. 저희가 다음 날 다른 버전을 내놓더라도 여러분에 코드에는 영향을 미치지 않죠.
이 이유가 저희 개발진에게도 장점이 됩니다. 새 버전을 내더라도 개발자들의 코드가 에러를 낼까봐 걱정하지 않아도 됩니다. 기존 API를 지우고 새로운 기능을 넣는 것도 문제 없습니다. 또한 번될되지 않기 때문에 어떤 기기에서도 사용이 가능합니다.
RelativeLayout (2:48)
RelativeLayout을 사용한 경험이 있으실 테죠. 겉으로 보이기에는 ConstraintLayout과 비슷한 점이 많습니다. 다른 요소와 관련지어서 자식 요소를 배치할 수 있는데, ConstraintLayout이 하는 역할과 비슷해 보입니다. 그러나 RelativeLayout는 주의해야할 몇 가지 이슈가 있습니다.
완전히 가상으로 지어낸 예제인데요, 컨테이너의 왼쪽과 아랫쪽에 constraint가 있는 이 버튼을 한 번 보시죠.
<?xml version="1.0" encoding="utf-8"?>
<RelativeLayout xmlns:android="http://
schemas.android.com/apk/res/android"
	android:layout_width="match_parent"
	android:layout_height="match_parent">
	<Button
		android:id="@+id/button6"
		android:layout_width="wrap_content"
		android:layout_height="wrap_content"
		android:layout_alignParentBottom="true"
		android:layout_alignParentEnd="true"
		android:layout_alignParentRight="true"
		android:layout_marginBottom="34dp"
		android:layout_marginEnd="24dp"
		android:layout_marginRight="24dp"
		android:text="Button" />
</RelativeLayout>

컨테이너의 높이를 Wrap Content로 설정하면 어떻게 될까요?
<?xml version="1.0" encoding="utf-8"?>
<RelativeLayout xmlns:android="http://
schemas.android.com/apk/res/android"
		android:layout_width="match_parent"
		android:layout_height="wrap_content">
		<Button
			android:id="@+id/button6"
			android:layout_width="wrap_content"
			android:layout_height="wrap_content"
			android:layout_alignParentBottom="true"
			android:layout_alignParentEnd="true"
			android:layout_alignParentRight="true"
			android:layout_marginBottom="34dp"
			android:layout_marginEnd="24dp"
			android:layout_marginRight="24dp"
			android:text="Button" />
</RelativeLayout>

버튼이 하단에 붙어서 마치 RelativeLayout에서처럼 작용합니다. 제가 바라던 바는 아니네요.
같은 일을 ConstraintLayout에서 한다면 Wrap Content를 설정하면 실제로 감쌉니다. If we do the exact same thing in ConstraintLayout, when you call Wrap Content, it wraps.
<?xml version="1.0" encoding="utf-8"?>
<android.support.constraint.ConstraintLayout
	xmlns:android="http://schemas.android.com/apk/res/android"
	xmlns:app="http://schemas.android.com/apk/res-auto"
	xmlns:tools="http://schemas.android.com/tools"
	android:layout_width="match_parent"
	android:layout_height="wrap_content">

	<Button
		android:id="@+id/button12"
		android:layout_width="wrap_content"
		android:layout_height="wrap_content"
		android:text="Button"
		app:layout_constraintBottom_toBottomOf="parent"
		android:layout_marginBottom="34dp"
		android:layout_marginEnd="24dp"
		app:layout_constraintRight_toRightOf="parent"
		android:layout_marginRight="24dp" />
</android.support.constraint.ConstraintLayout>

XML을 보면서 RelativeLayout에 비히 그다지 나쁘지 않다고 생각하시죠? 사실 단 두 개의 속성만 바꼈을 뿐입니다. 이들은 하단과 우측에 부모 컨테이너로부터 constraint를 적용하기 위해 사용했습니다. 다른 속성들은 익히 알고 있을 겁니다. 높이와 마진 등이죠.
중첩 Layout (4:34)
복잡하지 않은 레이아웃을 지닌 간단한 계층 구조를 한 번 볼까요? horizontal 하나와 여러 개의 vertical 레이아웃이 있는데 텍스트뷰라고 생각해 보겠습니다.

계산된 부모에 따라 텍스트뷰의 높이가 변한다면, 처음부터 모든 것을 다시 계산해야겠죠. 부모부터 계산을 시작해서 하위로 내려간다면 끝날 때까지 이런 계산이 계속될 겁니다. 계산해서 넘겨야 하는 것들이 정말 많아지겠죠.
레이아웃 속도에 관심을 갖는 이유는 부드러운 UI를 위해서는 한정된 시간에 보여줘야 하기 때문입니다. 만약 프레임에서 변화하는 것이 많다면 이런 계산도 한없이 많아집니다. 계층 구조가 깊어질 수록 정말 많은 measure 값을 넘겨야하는 상황에 봉착하게 됩니다.
레이아웃을 넘기는 것과 measure를 넘기는 것을 비교해 볼까요? 레이아웃은 위젯의 크기와 위치를 아는 것입니다. 한편 measure는 이들 많은 뷰에게 직접 자신의 값을 측정하도록 하므로 많은 비용이 듭니다. 텍스트뷰를 측정한다면 전체 텍스트를 위치시켜야만 합니다. 따라서 위치시키는 것보다 측정하는 것이 훨씬 많은 비용이 듭니다. 그러므로 정말 상황이 좋을 때만 레이아웃을 측정하길 권합니다.
도구에 대한 고려 (8:14)
성능을 고려해 봅시다. RelativeLayout과 ConstraintLayout 안에 동일한 레이아웃들을 넣는다면 ConstraintLayout의 성능이 동일하거나 더 좋습니다.
또한 간단한 위계 질서를 유지할 수 있다는 장점도 있습니다. 만약 ConstraintLayout이 더 느린 경우가 있다면 저희에게 보내주세요. ConstraintLayout이 더 빠르다고 확신하고는 있지만, 아직 최적화할 부분이 많습니다.
이제 측정 도구에 대해서 알아볼까요? RelativeLayout과 비슷하지만 RelativeLayout의 경우 두 개의 레이아웃을 넘기므로 더 느립니다. ConstraintLayout의 경우에는 그 대신 설정을 실행합니다. 즉, Wrap Content를 만든다면 크기 설정을 가진 위젯은 해당 위젯의 단일 measure값을 넘긴다는 겁니다. 한편 Match Constraint의 경우 두 개의 measure를 넘기죠.
라이브러리 크기도 차이가 납니다. 또한 희소 행렬을 사용해 메모리로 적게 사용하죠.
ConstraintLayout는 어떻게 작동할까요? 밑단에 선형 방정식 해석기가 있어서 관련 오류와 함께 선형 방정식을 지정할 수 있습니다.
문제 해결을 위해 우리는 조금 다른 방법을 사용했습니다. 이들 constraint 모델을 통해 직접적인 복구에 대해 알고 있으므로 많은 경우 이전 상황을 파악해서 직접 문제를 해결할 수 있습니다. 이 경우 나머지 시스템의 성능은 실제로 두 세 배 증대됩니다.

레이아웃 에디터를 만든 이유는 개발자들이 단지 XML을 작성하는 것보다 빠르게 개발할 수 있도록 하기 위해서입니다. 단, 익숙한 분들에게 XML 작성은 꽤 빠르게 할 수 있는 일이므로 XML도 그대로 남겨뒀고, 그 안에서 ConstraintLayout도 사용할 수 있습니다. RelativeLayout 보다 그다지 어렵지 않습니다.
side Constraint (14:45)
side constraint를 사용하면 RelativeLayout과 유사하게 한쪽 끝을 기준으로 위젯이 목표물을 향하도록 움직일 수 있습니다. 정렬을 위해 사용하는 기준선도 있습니다. 기준선은 텍스트의 바닥이므로 다른 크기의 두 버튼을 정렬시키되, 텍스트는 수직으로 만들 수도 있습니다. XML에서 이런 모습을 간단히 만들 수 있는데요. constraint를 시작하는 위치에서부터 ConstraintLayout을 시작하고 대상 constraint를 설정하면 됩니다.

이 경우 constraint는 해당 면이 목표의 면과 동일한 위치에 있도록 합니다. 요소의 ID나 Parent 키워드를 써서 목표를 지정할 수 있습니다. 부모의 데이터를 연결하면 자동으로 constraint에 부모를 사용하죠.

Center Constraint (16:15)
Center Constraint 를 사용하면 ConstraintLayout의 강력함을 잘 느낄 수 있습니다. 한 위젯의 왼쪽과 오른쪽에 두 개의 constraint를 설정하면 어떻게 될까요? 둘 다 맞을 수는 없겠죠?
app:layout_constraintLeft_toLeftOf="parent"
app:layout_constraintRight_toRightOf="parent"
이런 경우 center를 사용합니다. bias라는 개념이 있어서 기본 값은 50%이고 위젯의 중앙이 됩니다. 이 값을 변경해서 위치를 조정할 수 있고 UI를 좀 더 유연하게 만들 수 있습니다.

Dimension Constraints 도 사용해 보세요. 고정된 크기를 지정하거나 Wrap Content를 사용하면 되는데, Match Parent는 사용하면 안됩니다. ConstraintLayout의 높이, 너비나 둘의 비율을 지정할 수도 있습니다.
Match Constraint 도 있습니다. Wrap Content나 고정 크기를 사용하는 대신 linear layout처럼 zero DP를 넣고 사용합니다. 이 경우 constraint에 맞게 위젯의 크기가 정해집니다. 위젯이 Match Constraint를 사용해서 Wrap Content가 되면 크기가 늘어납니다. 마진을 지정해서 크기가 마진만큼 작아지게 할 수도 있습니다.

app:layout_constraintDimensionRatio="h,1:1"
비율의 경우 크기 하나를 Match Constraint로 지정하면 됩니다. 문제 해결사에 의해 크기가 정해지길 원하면 zero DP와 특정 비율을 지정하세요. 이 속성을 하나의 높이나 너비 중 하나에만 지정하고 나머지는 꼭 Match Constraint로 지정해야 합니다.

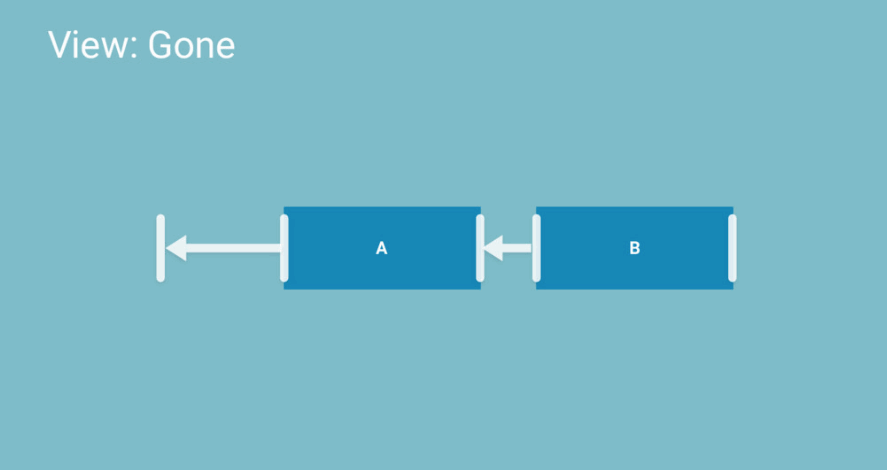
GONE과 Chain (19:29)
View.GONE에 대해 모르는 분들이 많습니다. A 뷰와 A에 constraint를 갖는 B 뷰가 있는데 A 뷰를 GONE으로 마킹하고 싶은 경우를 예로 들어 보겠습니다. A는 지워졌지만 방정식에서는 여전히 사용됩니다. A가 한 지점으로 축소돼서 슬라이드 아웃됩니다. A와 B 사이에 있던 여백은 A가 있을 때만 사용하고 싶은 경우가 있죠.
app:layout_goneMarginLeft="60dp"
GONE Margin과 관련된 강력한 기능으로는 Chain이 있습니다. 양방향으로 작용하는 constraint라고 생각하시면 쉬운데요, 두 위젯 이상의 관계에서 양방향으로 작용합니다.
<Button
	android:id="@+id/button1"
	android:layout_width="wrap_content"
	android:layout_height="wrap_content"
	android:text="Button"
	tools:layout_editor_absoluteY="10dp"
	app:layout_constraintRight_toLeftOf="@+id/button2"
	app:layout_constraintLeft_toLeftOf="parent" />
<Button
	android:id="@+id/button2"
	android:layout_width="wrap_content"
	android:layout_height="wrap_content"
	android:text="Button"
	tools:layout_editor_absoluteY="10dp"
	app:layout_constraintRight_toRightOf="parent"
	app:layout_constraintLeft_toRightOf="@+id/button1" />
XML에서 이를 사용하는 방법은 사실 눈에 잘 들어오지는 않지만 왼쪽이 부모의 오른쪽에 연결되고, 오른쪽에 다른 버튼의 왼쪽에 연결된 것을 볼 수 있습니다. 두 개의 constraint가 반대 방향으로 작동하죠.
chain에는 몇 가지 흥미로운 점이 있습니다. 첫째로, chain의 처음에 특정 속성을 설정했다면 이 것이 chain의 행동을 좌우한다는 겁니다. 간단히 chain을 만들고 spread, spread inside, weighted, packed 등의 스타일을 지정해서 chain의 행동을 설정할 수 있습니다.
Weighted은 좀 다릅니다. B와 C가 zero DP이고, 위젯이 같은 크기로 분할해서 늘어납니다. 한 위젯이 다른 위젯보다 큰 크기를 갖게 할 수도 있습니다.
Packed도 흥미롭습니다. Linear Layout 같은 그룹 모양으로 bias를 지정할 수도 있습니다. 차이점이라면 유사한 축을 기반으로 움직인다는 겁니다.
app:layout_constraintHorizontal_chainStyle="spread"
app:layout_constraintHorizontal_chainStyle="spread_inside"
app:layout_constraintHorizontal_chainStyle="packed"

Guideline (22:53)
UI를 만드는데 도움이 되기 위해 Guideline을 만들었습니다. 에디터에서 할 수 있을만한 일로 보이지만, 사실 뷰 계층에 자동으로 올라가지는 않습니다. Guideline의 경우 마지막 패스에서 완전히 사라지고 레이아웃도 되지 않습니다. 예를 한 번 보시죠.
<android.support.constraint.Guideline
	android:layout_width="wrap_content"
	android:layout_height="wrap_content"
	android:id="@+id/guideline"
	app:layout_constraintGuide_begin="20dp"
	android:orientation="vertical" />

ConstraintSet (24:12)
마지막으로 보여드릴 것은 ConstraintSet입니다.
ConstraintSet mConstraintSet1 = new ConstraintSet(); // create a Constraint Set
ConstraintSet mConstraintSet2 = new ConstraintSet(); // create a Constraint Set

mConstraintSet2.clone(context, R.layout.state2); // get constraints from layout
setContentView(R.layout.state1);
mConstraintLayout = (ConstraintLayout) findViewById(R.id.activity_main);
mConstraintSet1.clone(mConstraintLayout); // get constraints from ConstraintSet

TransitionManager.beginDelayedTransition(mConstraintLayout);
mConstraintSet1.applyTo(mConstraintLayout
굉장히 복잡한 중첩 계층 구조에서 뭔가 움직이려면 많은 이슈들이 발생하죠. 하지만 이런 단순한 레이아웃에서라면 요소를 움직이는 것이 정말 쉬워집니다.
ConstraintSet을 사용하면 더 나아갈 수 있습니다. constraint 세트를 저장하고 데이터를 유지할 수 있죠.

결론 (36:33)
앞으로 유연성을 더 증대하기 위해 노력해나갈 예정입니다. 변환 툴을 사용하면 예전 레이아웃을 변환할 수도 있습니다. 버그를 발견하면 주저 말고 저에게 연락해서 리포트해 주세요!
컨텐츠에 대하여
이 컨텐츠는 저자의 허가 하에 이곳에서 공유합니다.